Since recently porting over the archived posts from my first Roubo build almost 8 years ago, I thought I should probably write a brief retrospective now that I’ve completed the rebuild (posts to follow).
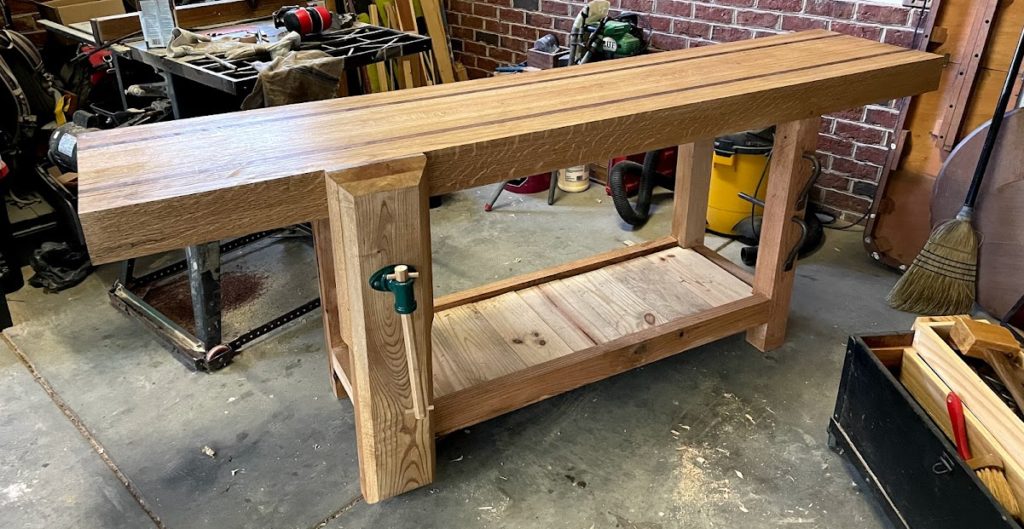
What a journey it’s been – I started my very novice interpretation of a Roubo in 2013, dragged my feet, stopped a few times and finally wrapped up in 2015. I used and abused that bench for 5 years, until it was destroyed when a tree fell on my garage in the Spring of 2020. After moving, I salvaged as much of the old bench as I could, and rebuilt a real Roubo this time – 8′ in length by nearly 5″ thick.
I have learned a lot over the years, and reading back through my original posts from all those years ago, I’m incredibly tempted to delete them all and hide all of those mistakes forever. But, in publicizing my mistakes and inexperience, I hope to help save others from the same decisions I made. And honestly, as embarrassing as they were – that bench was still awesome. It was still very solid and got the job done just fine.
I have always been someone with a burning desire to create things – and that desire almost always means that I can’t wait to see an idea come to completion, which means I take shortcuts towards the end to get it done. I have been battling that tendency since I was a kid, and still face it daily. I can point to details on nearly every project I finish that could have been much more refined if I had just taken the extra day to do it right, and I am continually trying to improve that character flaw. As I look back on the bench build from 2013-2015, I see a lot of this, combined with the lack of tools/experience to actually get it done correctly.
I like to think that I improved in this area during the second build, though elements still shine through. I will try to point those out in the subsequent posts. However, here are my takeaways for young bench builders, as I look through those old posts.
First, the few things I actually got right
- The leg vise
- It’s simply my favorite aspect of the bench, and the only thing I did differently the second time was to make it beefier. It’s simple to make, very inexpensive and it pays dividends over the years.
- Oak
- This was a stretch for me in the early days (and the reason I went thinner on the top), but both sentimentally and practically it was a good choice. Very heavy, solid and stable once the wood moisture content had equalized.
- Drawbored/pegged joints.
- I disassembled the remainder of the bench after it was smashed, and the remaining leg joinery was still very tight. I ended up having to drill most of them out. Not bad for no glue and after being smashed by a 4′ diameter oak tree.
- Actual joinery
- The one corner I’m most thankful that I did not cut is to do this thing with full wood on wood joinery – no metal hardware aside the vise screw.
And now, the much longer list of mistakes I made:
- Skimping on material
- No way around it – the bench should have been beefier. I have plenty of excuses – I was poor, had limited access to material, limited tools, etc. Doesn’t matter, I should have ground it out and figured a way to get it beefier
- Shallow tenons
- Every tenon on the bench – the legs and into the top – should have been at least twice as long. That would have prevented a lot of the racking I dealt with over the years.
- No joinery glue
- Look, there are pros and cons here, but at the end of the day I would (and did) use glue on the next bench. I was never *that* happy with the tightness of the tenons that went into the top.
- Not surfacing material properly
- This is a huge corner I cut throughout this bench, and one that embarrasses me the most. I didn’t have a joiner at the time and I didn’t have any clue how to really surface material with a hand plane (or sharpen, or…), and as a result I just skipped this step all too often. I relied too much on “clamping out” imperfections on the top and didn’t even get the underside flat! Lots of lessons learned here.
- Gluing up top before surfacing
- Similar to above, I got eager to see the top take form, and I glued up laminations of all different heights. This proved a monster to surface later, which meant I didn’t do so to the extent I should have, creating even more issues.
- Leg vise twist
- The white oak board I selected for my leg vise was fairly wet when I began construction, and as it dried it developed major twist. In practice, this did not impact the work-holding ability of the vise, but it just created frustrations opening and closing the vise, and always looked shoddy
- Hills & valleys
- Finally, along the theme of several other things – in 5 years of using this bench, I never properly flattened the top. Never! And it messed up many projects. Call it naivety, call it laziness, ignorance, whatever – probably all of the above. Flatten ya’ benches!